Category: mingw-w64
Adding a directory to your Windows path
When you’re setting your BioFVM / PhysiCell g++ development environment, you’ll need to add the compiler, MSYS, and your text editor (like Notepad++) to your system path. For example, you may need to add folders like these to your system PATH variable:
- c:\Program Files\mingw-w64\x86_64-5.3.0-win32-seh-rt_v4_rev0\mingw64\bin\
- c:\Program Files (x86)\Notepad++\
- C:\MinGW\msys\1.0\bin\
Here’s how to do that in various versions of Windows.
Windows XP, 7, and 8
First, open up a text editor, and concatenate your three paths into a single block of text, separated by semicolons (;):
- Open notepad ([Windows]+R, notepad)
- Type a semicolon, paste in the first path, and append a semicolon. It should look like this:
;c:\Program Files\mingw-w64\x86_64-5.3.0-win32-seh-rt_v4_rev0\mingw64\bin\;
- Paste in the next path, and append a semicolon. It should look like this:
;c:\Program Files\mingw-w64\x86_64-5.3.0-win32-seh-rt_v4_rev0\mingw64\bin\;C:\Program Files (x86)\Notepad++\;
- Paste in the last path, and append a semicolon. It should look something like this:
;c:\Program Files\mingw-w64\x86_64-5.3.0-win32-seh-rt_v4_rev0\mingw64\bin\;C:\Program Files (x86)\Notepad++\;c:\MinGW\msys\1.0\bin\;
Lastly, add these paths to the system path:
- Go the Start Menu, the right-click “This PC” or “My Computer”, and choose “Properties.”
- Click on “Advanced system settings”
- Click on “Environment Variables…” in the “Advanced” tab
- Scroll through the “System Variables” below until you find Path.
- Select “Path”, then click “Edit…”
- At the very end of “Variable Value”, paste what you made in Notepad in the prior steps. Make sure to paste at the end of the existing value, rather than overwriting it!
- Hit OK, OK, and OK to completely exit the “Advanced system settings.”
Windows 10:
Windows 10 has made it harder to find these settings, but easier to edit them. First, let’s find the system path:
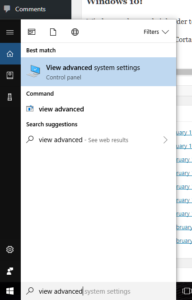
- At the “run / search / Cortana” box next to the start menu, type “view advanced”, and you should see “view advanced system settings” auto-complete:

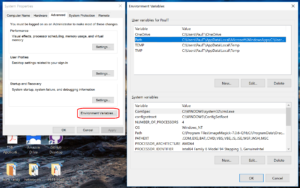
- Click to enter the advanced system settings, then choose environment variables … at the bottom of this box, and scroll down the list of user variables to Path

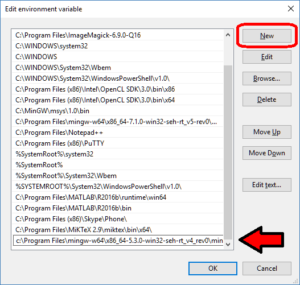
- Click on edit, then click New to add a new path. In the new entry (a new line), paste in your first new path (the compiler):

- Repeat this for the other two paths, then click OK, OK, Apply, OK to apply the new paths and exit.
Setting up a 64-bit gcc/OpenMP environment on Windows
Note: This is the part of a series of “how-to” blog posts to help new users and developers of BioFVM and PhysiCell. This guide is for Windows users. OSX users should use this guide for Homebrew (preferred method) or this guide for MacPorts (much slower but reliable). A Linux guide is expected soon.
These instructions should get you up and running with a minimal environment for compiling 64-bit C++ projects with OpenMP (e.g., BioFVM and PhysiCell) using a 64-bit Windows port of gcc. These instructions should work for any modern Windows installation, say Windows 7 or above. This tutorial assumes you have a 64-bit CPU running on a 64-bit operating system.
In the end result, you’ll have a compiler, key makefile capabilities, and a decent text editor. The entire toolchain is free and open source.
Of course, you can use other compilers and more sophisticated integrated desktop environments, but these instructions will get you a good baseline system with support for 64-bit binaries and OpenMP parallelization.
What you’ll need:
- MinGW-w64 compiler: This is a native port of the venerable gcc compiler for windows, with support for 64-bit executables. Download the latest installer (mingw-w64-install.exe) here. As of February 3, 2020, this installer will download gcc 8.1.0.
- MSYS tools: This gets you some of the common command-line utilities from Linux, Unix, and BSD systems (make, touch, etc.). Download the latest installer (mingw-get-setup.exe) here.
- Notepad++ text editor: This is a full-featured text editor for Windows, including syntax highlighting, easy commenting, tabbed editing, etc. Download the latest version here. As of February 3, 2020, this will download Version 7.8.4.
Main steps:
1) Install the compiler
Run the mingw-w64-install.exe. When asked, select:
Version: 8.1.0 (or later)
Architecture: x86_64
Threads: posix (switched to posix to support PhysiBoSS)
Exception: seh (While sjlj works and should be more compatible with various GNU tools, the native SEH should be faster.)
Build version: 0 (or the default)
Leave the destination folder wherever the installer wants to put it. In my case, it is:
C:\Program Files\mingw-w64\x86_64-8.1.0-posix-seh-rt_v6-rev0
Let MinGW-w64 download and install whatever it needs.
2) Install the MSYS tools
Run mingw-get-setup.exe. Leave the default installation directory and any other defaults on the initial screen. Click “continue” and let it download what it needs to get started. (a bunch of XML files, for the most part.) Click “Continue” when it’s done.
This will open up a new package manager. Our goal here is just to grab MSYS, rather than the full (but merely 32-bit) compiler. Scroll through and select (“mark for installation”) the following:
- mingw-developer-toolkit. (Note: This should automatically select msys-base.)
Next, click “Apply Changes” in the “Installation” menu. When prompted, click “Apply.” Let the package manager download and install what it needs (on the order of 95 packages). Go ahead and close things once the installation is done, including the package manager.
3) Install the text editor
Run the Notepad++ installer. You can stick with the defaults.
4) Add these tools to your system path
Adding the compiler, text editor, and MSYS tools to your path helps you to run make files from the compiler. First, get the path of your compiler:
- Open Windows Explorer ( [Windows]+E )
- Browse through C:\, then Program Files, mingw-w64, then a messy path name corresponding to our installation choices (in my case, x86_64-8.1.0-posix-seh_rt_v6-rev0), then mingw64, and finally bin.
- Record your answer. For me, it’s
C:\Program Files\mingw-w64\x86_64-8.1.0-posix-seh-rt_v6-rev0\mingw64\bin\
Then, get the path to Notepad++.
- Go back to Explorer, and choose “This PC” or “My Computer” from the left column.
- Browse through C:\, then Program Files (x86), then Notepad++.
- Copy the path from the Explorer address bar.
- Record your answer. For me, it’s
c:\Program Files (x86)\Notepad++\
Then, get the path for MSYS:
- Go back to Explorer, and choose “This PC” or “My Computer” from the left column.
- Browse through C:\, then MinGW, then msys, then 1.0, and finally bin.
- Copy the path from the Explorer address bar.
- Record your answer. For me, it’s
C:\MinGW\msys\1.0\bin\
Lastly, add these paths to the system path, as in this tutorial. (Note that later versions of the mingw-w64 installer might already automatically update your path.)
5) Test your setup
I wrote a sample C++ program that tests OpenMP parallelization (32 threads). If you can compile and run it, it means that everything (including make) is working! :-)
Make a new directory, and enter it
Enter a command prompt ( [windows]+R, then cmd ). You should be in your user profile’s root directory. Make a new subdirectory, called GCC_test, and enter it.
mkdir GCC_test
cd GCC_test
Grab a sample parallelized program:
Download a Makefile and C++ source file, and save them to the GCC_test directory. Here are the links:
- Makefile: [click here]
- C++ source: [click here]
Compile and run the test:
Go back to your (still open) command prompt. Compile and run the program:
make
my_test
The output should look something like this:
Allocating 4096 MB of memory ...
Done!

Entering main loop ...
Done!
Open up the Windows task manager ([windows]+R, taskmgr) while the code is running. Take a look at the performance tab, particularly the graphs of the CPU usage history. While your program is running, you should see all your virtual processes 100% utilized, unless you have more than 32 virtual CPUs. (This is a good indication that your code is running the OpenMP parallelization as expected.)
Note: If the make command gives errors like “**** missing separator”, then you need to replace the white space (e.g., one or more spaces) at the start of the “$(COMPILE_COMMAND)” and “rm -f” lines with a single tab character.
What’s next?
Download a copy of PhysiCell and try out the included examples! Visit BioFVM at MathCancer.org.
- PhysiCell links:
- PhysiCell Method Paper at bioRxiv: https://doi.org/10.1101/088773
- PhysiCell on MathCancer: http://PhysiCell.MathCancer.org
- PhysiCell on SourceForge: http://PhysiCell.sf.net
- PhysiCell on github: http://github.com/MathCancer/PhysiCell
- PhysiCell tutorials: [click here]
- BioFVM links:
- BioFVM announcement on this blog: [click here]
- BioFVM on MathCancer.org: http://BioFVM.MathCancer.org
- BioFVM on SourceForge: http://BioFVM.sf.net
- BioFVM Method Paper in BioInformatics: http://dx.doi.org/10.1093/bioinformatics/btv730
- BioFVM tutorials: [click here]